The Best Gadget For Blogger
Add Digg Button

Log in to your blogger account
Go to edit html
Make sure to back up your template first
Now find this
<data:post.body/>
Immediately before that paste this code
<!-- DIGG -->
<div style='float:right;'><script type='text/javascript'>digg_url = '<data:post.url/>';</script><script src='http://digg.com/tools/diggthis.js' type='text/javascript'/></div>
Then Save.

Dancing Links and Pictures
Log in to your blogger account
Go to Edit Html
Make sure to Backup template first
Now find this code
</head>
Immediately before that paste this code
<!--DANCING-NUDGE-LINKS-STARTS-->
<script src='http://code.jquery.com/jquery-latest.js' type='text/javascript'/>
<script type='text/javascript'>
$(document).ready(function() {
$('a.nudge').hover(function() { //mouse in
$(this).animate({ paddingLeft: '20px' },400);
}, function() { //mouse out
$(this).animate({ paddingLeft: 0 }, 400);
});
});
</script>
<!--DANCING-NUDGE-LINKS-STOPS-http://bloggerstop.net-->
How it works?
Go to Edit Html
Make sure to Backup template first
Now find this code
</head>
Immediately before that paste this code
<!--DANCING-NUDGE-LINKS-STARTS-->
<script src='http://code.jquery.com/jquery-latest.js' type='text/javascript'/>
<script type='text/javascript'>
$(document).ready(function() {
$('a.nudge').hover(function() { //mouse in
$(this).animate({ paddingLeft: '20px' },400);
}, function() { //mouse out
$(this).animate({ paddingLeft: 0 }, 400);
});
});
</script>
<!--DANCING-NUDGE-LINKS-STOPS-http://bloggerstop.net-->
How it works?
For links
<a href="Your URL" class="nudge">Text Here!</a>
Move Mouse Here!
For images
<a href="Image URL" class="nudge"><img src="Image Url"/></a>

<a href="Your URL" class="nudge">Text Here!</a>
Move Mouse Here!
For images
<a href="Image URL" class="nudge"><img src="Image Url"/></a>
New Blogger Stats
Introducing Blogger Stats
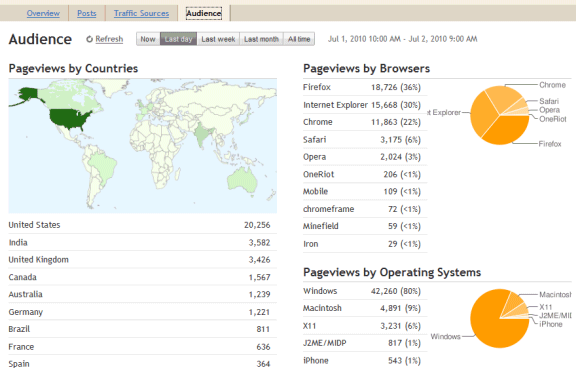
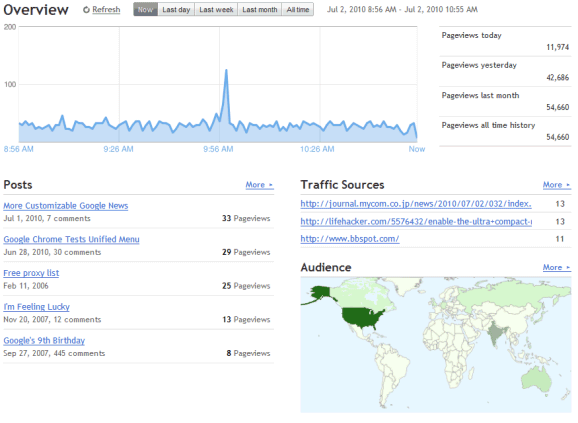
Just in time for our eleventh birthday, we are excited to introduce Stats for Blogger. First launched to Blogger in Draft back in July, Blogger Stats is a cool real-time stats service that's fully integrated with Blogger; you don't need to do anything to enable it for your blog. You can find the new Stats tab on your blog’s dashboard—go ahead and take it for a spin!
Feature Highlights
Stats is an important piece of the blogging puzzle, as it allows you to track your blog's traffic and find out exactly what your audience is looking for. As such, integrated, real-time stats has been one of the most frequently requested features from our users. You can find more information about Blogger Stats in our earlier announcement; meanwhile, here are some quick highlights for you.
* Real-time tracking. Each time your blog is viewed, you can see the change on your stats almost immediately
* Insights about your audience. Top search keywords, countries, browsers, and more
* Great user interface. Beautiful, easy-to-read graphs and charts
Updates
After our initial launch to Blogger in Draft, we had some very helpful feedback and suggestions from you. Based on them, we’ve made improvements including the following:
* Self-view exclusion. Some of you wanted Blogger Stats to exclude your own pageviews, and now there’s an option for that: On Stats | Overview, click on the “Don’t track your own pageviews” link (it’s on the right side, under the pageview summary) and select the “Don’t track my pageviews” option. We’re also now excluding traffic coming from Blogger admin pages and post Preview, providing more accurate pageview data.
* More effective bot traffic filtering. We’ve made several improvements to detect “bots” (the non-human visitors, such as crawlers) including extending our list of known “bots” to provide more accurate pageviews from real visitors.
* Internationalization. Blogger Stats is now available in more than 40 languages.
We hope you like Blogger Stats. By the way, there must be something good about August—not only is it our birth month, we’ve gone from four Admin Dashboard tabs to six, just this month alone! (The other new tab we’ve added this month was the Comments tab, which was another highly requested feature.) We still have some more ground to cover, but just wanted to say we’re working really hard to deliver the features you’ve wanted to see on Blogger. Looking forward to seeing you all at the upcoming Meetup!

Infolinks on Blogger
Puting Infolinks to your blog will increases your revenue to your blog provided you have lot of traffic to your blog.
Go to Infolinks.com
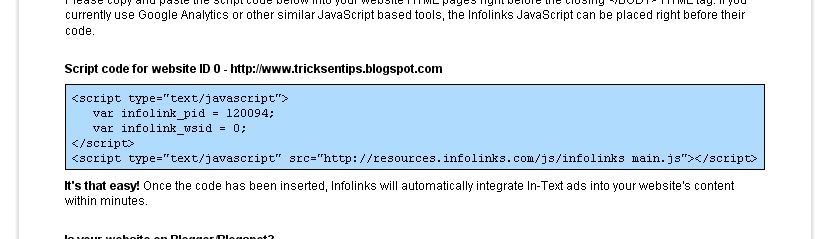
Register there and finally when you get the ad code copy that.
See Image Like this:
Login to your Blogger
Click on Layout.
Then click on Edit HTML.
Find </body>
Paste the code given by Infolinks to you just before the body tag.
Click on Layout.
Then click on Edit HTML.
Find </body>
Paste the code given by Infolinks to you just before the body tag.
Remember!
It takes 2 business days(all days in the week except saturday and sunday)
It takes 2 business days(all days in the week except saturday and sunday)
For the infolinks ads to appear on your blogger blog.
It will appear if is accepted.
How to install MyBlogLog on Blogger?

- First, make a full backup of your blog template by going to Template>Edit HTML in your Blogger dashboard, then clicking on the "Download full template" link near the top of the page. It is always good practice to do this before making any adjustments to your blog's template in case you make a mistake and need to revert back to a working template afterwards!
- Next, go back to the Edit HTML section of your dashboard, and check the "expand widget templates" box. Then, just before the closing </head> tag in your template, insert the following lines of code:
<script src='http://blog.merlinox.com/MrX/Blog/test/myBlogAvatar2.js' type='text/javascript'/>
This will link to the javascript used to power the comment avatars which is hosted by Merlinox. - Next, you will need to find the following line of code:
<b:loop values='data:post.comments' var='comment'>
This will be in the comments section of your template, and is easily found using the search function of your browser (CTRL+F). If you cannot find this line, this is probably because you have forgotten to expand the widget templates! - Right after this phrase, add the following section of code:
<div style='border:0;float:left;margin: 0 5px 0 0;'>
<script>
myBlogAvatar('<data:comment.id/>','<data:comment.authorUrl/>');
</script>
</div> - Now, save your template and take a look at one of your blog posts which has a few comments. You will see that any commenter who has a MyBlogLog account and avatar will now have their image featured beside their name. Those who do not have a MyBlogLog account will feature the default question mark avatar instead.
As you have read, this is quite an easy hack to implement in your blog. This will enable MyBlogLog comment avatars for your comments, even if you are not a member of MyBlogLog yourself!
Add Apture toolBar for your Blog

Today no one can deny that the social bookmarking and sharing is one of the most important factors for making your blog more popular and more visible for all your targeted visitors.
And i’m sure that you want to make it easier for your visitors to share your posts on their favorite social networking sites.
today we’ll talk about the new Apture ToolBar and it’s features and how to add it to your blogger ( blogspot ) blog.
About Apture ToolBar and it’s features.
The Apture Site Bar is a new way to give readers more information without leaving the page. this is what Apture authors says about the toolbar, but i’ll try to describe what is this toolbar can do for you,
once your visitor scroll down on your blog, this bar will appear loaded with some great features.
- Share on facebook button with a counter.
- Tweet this for twitter button with a counter.
- Share on email
- Search box with jquery, and this mean that your visitor don’t have to leave the page when he search for another content.
- When your visitor can select any part of your posts text small button will appear that says Search
- You can customize it with your own logo.
How To Add It To Your Blog.
You can add it in a very easy way, please visit www.apture.com,
and click Design a bar now
and on the next page, please fill the following info.
- Your website address:
- Your email:
- Upload a Logo or Set Title you can upload your blog logo from your computer ( don’t forget to click upload ) , or just type your blog title.
- Pick your bar color
and now click Get my bar. please wait till the site finish loading and i’ll give you a code titled, Apture Magic Javascript
Copy the code and now go to your blogger account,
navigate to Layout >> Edit html and now find the following code.
</body>
and paste your toolbar code before it.
Now Click Save Template.
Google Custom Fonts For Blogger

For years, Bloggers and web-designers were using those simple web fonts to style their blogs and templates. They didn’t had an option to change those fonts as there were only some fonts accepted world-wide as web fonts. It was impossible to use another fonts on web pages as they would appear in ten monitors in ten different styles ! Their appearance may change in respect of the change in the OS, softwares … etc of that computers. So web-designers were trapped under those countable fonts…
But now Google has launched their new service Google web fonts with the slogan – ‘Making the Web Beautiful!’. This service will allow you to use custom fonts on google font directory on our blog/ websites without any sign-up or anything else. As it’s from ‘Google’, It doesn’t have any complications and it’s also completely free for commercial and private use.,No restrictions held or no harsh laws. This could make your blog look more stylish and is applicable for blogger blogs too. Don’t get amazed, It’s True ! I’ll show you how to do it with blogger.
Back-up Your blogger template
It’s always the first step for any blogger tutorial. I’ll be using this step as the first step for all my tutorials on allblogtools. You should always take a back-up of your blogger template before testing any hacks on blogger.
For this, go to Design or layout -> Edit HTML -> Download full template
Select your Font
For this, Go to Google Font directory and select any one of those stylish font, which you want to use on your blog.
Get the Code for your Font
In this tutorial I’ll be using the Tangerine font, Which I liked the Most. For this just click on the name Tangerine and a new windows will open. Select The tab named ‘Get the code‘.
Add the Code to your Blogger template
Now you have to copy the Code they provide and you have to add the code to your blogger template, just after
<head>tag of your blogger template.
The code may look something like;-
<link href='http://fonts.googleapis.com/css?family=Tangerine'Important : ?Please add a Forward slash (“/“) before the the end of the tag (“>”) of this code. i.e, The above code should look like ;-
rel='stylesheet' type='text/css'>
<link href='http://fonts.googleapis.com/css?family=Tangerine'This is because blogger use XML for coding which won’t allow unclosed tags like this. So you have to close this tag by adding the forward slash.
rel='stylesheet' type='text/css'/>
Now Copy the code and paste it just after
<head>It should be the first code after the
<head>Section. Otherwise it could cause problems while displaying the text in IE and may be in Firefox.
Please remember to add the forward slash before the end tag. and now please click Save Template
now the code required for Google web font has been added to your blog. Now you have to can use google fonts in your blog by applying it on any widget tags.
Add the CSS code for Font to your Blog
Now the last and final step. In this step, you have to specify where you want to add the font and have to add the css code for it.
If you want to make the font appear for a specific sentence only in your blog post, then use the HTML code ;-
<div style="font-family: 'FontName', serif;">Your text</div>
in the above code change
FontName : to the font name that you chosen it from google.
Your text : to any text you want.
If you want the font to appear for your
- Blog titile
- Post title
- post body
- sidebar fonts
you have to add the CSS code for it. Don’t worry, It’s very very easy.
Here I’ll tell you How you can change your post title. For this you have to search for the title css code
.post h3or
.post-title h3This is the common css code for post title in blogger. now we have to add the css code for the new fonts for this code,. For this, add/modify these lines below the above codes.
font-family: 'Your Font Name';
The code should look something like ;-
.post h3 {
font-family: 'Your Font Name';
}
Here I had added the css code for Tangerine. You should post the css code between the “{” and “}” tags of .post h3. Like wise you can add the css code for other position too by modifying the css code.
Here i’ll mention the main positions and the common css code for each position. Please note that it may change if you are using any custom template.
- Title : h1
- Post title : .post h3 or .post-title
- Post font : .post-body
- Sidebar : .sidebar h2
the above tags helps you to change the font for any position of the above 4 tags.
for example, if you want to change the post font,
in the above table, you can see that the tag to edit for the post font, is .post-body
so you have to search for .post-body in your template, and below it, add the following line.
font-family: 'google Font Name';
the final code should looks like
The code should look something like ;-
.post-body {
font-family: 'Your Font Name';
}
These above values may change in some custom themes. But these are the common seen tags. If you didn’t find the tags with this, try searching similar tags.
Top 10 Business Apps for the iPad
The iPad is the middle ground for freelancers and small business owners who want to mobilize without paying to maintain a laptop. With the sheer mobility, including mobile Internet, and the lower cost of the iPad, tablets are showing their ability to Free businesses from the confines of location. However, some businesses are still skeptical about the functions of the iPad itself. Their doubts are based almost entirely on a lack of understanding of the application market. Here are a few of the great apps that make an iPad investment worthwhile.

Absolute Email Synchronization
The iPad has several built-in applications to help you access your email. You can pull in Email hosting for Exchange and Outlook with the iPad’s apps. It’s simple to retrieve, review, and send messages on an iPad. Emailing often includes sending attached documents, and the device supports most of the standard document and image format types.iWork Suite
Pages, Numbers, and Keyworks are the three actual applications you’re getting with this suite. This means you get word processing, spreadsheets, and presentations. The cost? Just ten dollars each.GoToMeeting
GoToMeeting lets you get involved in screen sharing meetings. You’re not just a distant observer, either. Voice and text chat mean you can interact with all other participants in the meeting.Evernote
Taking notes that you can access from anywhere is important and the main appeal of Evernote. Being able to attach documents, take pictures, leave audio notes, or add a video to a note is useful.Bento
If you need to make information databases for your business, Bento is a great way to go. Its simple user interface and two dozen built-in templates allow you to create expense sheets, invoices, event plans, inventory information, and more with ease.Things
Things comes to your iPad for twenty dollars. With how much time and effort it saves you, it’s a great investment. This advanced to-do organizer integrates scheduling, prioritization, and multi-platform synchronization for some powerful results.VNC Viewer
While your iPad may be your mobile masterpiece, it probably isn’t your only computer. However, with VNC Viewer, your other computers will be at your fingertips while on the go, too. This remote access application lets you get files, view information, and otherwise interact with other authorized PC or Macintosh systems.Box.net
One of the best places to store your files is in the web or, more specifically, in the cloud. With Box.net, you can easily store, edit, and retrieve documents directly from the cloud.Files to Go
The file organization of the iPad could use some simplification. Thus, Files to Go exists. This app not only grants some advanced organization features, it lets you easily transfer files from your computer to your iPad.Square
With Square, your iPad becomes a mobile credit card terminal. You can either key in numbers or buy a card swipe that is easy to attach.Whatever you need for your business, you’ll find a solid application you can use on the iPad. Is there any reason not to free yourself from the desk with on?
IrfanView for Bloggers

Irfanview is a very good free image editor which can be very useful for bloggers working with images. I used it very frequently especially to edit and upload screenshots to my posts,
What and how do I use Irfanview for my blogs? Well, very frequently, I need screenshots to better explain what I want I have in mind. (I refer to screenshots below because I mainly work with screenshots. The same methods apply to photos, etc.) To do that, in the particular page, I press the key Printscreen, open Irfanview, click Edit in the menu bar and choose Paste, and the screen image appear in its editor window. With this method, the cursor will not be displayed. If I want the mouse cursor to be shown on a particular spot to draw attention to it, I first go to the screen I want pasted, go to Irfanview, press C, and a pop-up will appear. I select the relevant options, make sure "Include mouse cursor" is ticked, click start and I will be taken to the previous screen. I then press ctrl+F11 (the key is configurable, but F11 is the default. It can be changed but I have no reason to change it), and I will be taken back to Irfanview with the screen in the image editor window with the mouse cursor in the spot where I last left it.
I can also highlight a spot by drawing a circle around it. Unfortunately, Irfanview does not have that feature. For that, I have to use Paint which comes with Windows (under Accessories)
Cropping
If I want only a particular section of the screen of the screen to be included, I drag and drop the mouse in that section. a broken-line box will surround the section. I click on Edit in the menu bar and select "Crop selection" and the rest of the screen will disappear, leaving only the section. I then save the file, usually in jpg format (there is a huge selection of formats to choose from in Irfanview). I then upload the screenshot into the post.
Add text
If I want text to be displayed in certain section of the screnshot, I drag and release to highlight that section of the screenshot I want the text to be displayed, click Edit in the menu bar, select "Insert text into selection", a pop-up will appear with a box for me to type in the text. There will be other options such as choose font, alignment left, center or right, etc. When I am finished, I just click OK and the text will appear in the screenshot.
Highlighting particular section of the screen with Paint
When I want to draw attention to certain section of the screen, such as putting a circle or a rectangle around a section of the screenshot, it unfortunately can't be done in Irfanview. I first save the file. I then open Paint available in the Accessories section of Windows. I open the file in Paint. I first select the color of the ellipse I want it to be, usually red by clicking on the square of color in the palette at the bottom of Paint. Then I select the icon for ellipse in the toolbar on the left side of Paint. I then drag and drop the mouse over the section I want to highlight, and an ellipse will surround that section. To see an example of a screenshot with a portion of it highlighted by a red ellipse, surf over to Generating simple graphic header using Irfanview photo editor (click "BACK" button to return to this page). If I am not happy, I click Edit in the menu bar and select Undo, and the ellipse will disappear. I repeat again until I am satisfied. I then save the file

(the default format in Paint is bmp. I normally change it to jpg). The screenshot is then ready for upload to the post.
Resizing image size
Frequently, we have to resize images so that they will fit into the space we want them to display, etc. This can very easily be done in Irfanview. In Paint (which I seldom use) the choices are to resize in percentage, which can be problematic if you need the width to be in exact pixels. In Irfanview, just click Image in the menu bar and select Resize/resample, and a pop-up will appear. There are many choices (pixels, cm., inches, percentage). You can see the choices in the screenshot below
(click to enlarge):
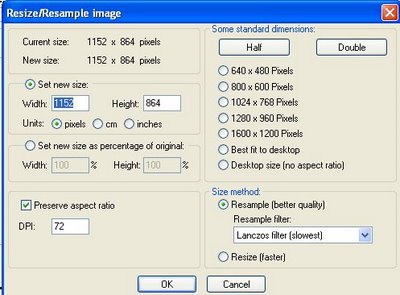
If, for example, you want to resize the image so that the width do not exceed the width of the column, enter the pixels into "width", leave the "height" alone and tick "Preserve aspect ratio". The height will be automatically set to keep the image from being distorted. You can then either save the image to be uploade in its original size or just use the figures in the width="" height="" attributes in the <img> tag. (Note: if you are using the <img> tag, you only need to enter the attribute width="X". If the height attribute is left out, the resulting image will automatically be scaled so as to keep the aspect ratio constant).
Save or convert picture into many different formats
With Irfanview, you can save or convert your picture into very many different formats. I am using the Irfanview 3.98 version. There are already a few upgrades which I didn't bother with, and I wouldn't know if there had been any changes in the number of file formats. For the version I have, there are altogether 19 choices which I list below:Irfanview 3.98
bmp Windows bitmap
ecw Enhanced compressed wavelet
emf Enhanced Windows metafile
fsh EA Sports format
gif Compuserve gif
ico Windows icon
jp2 JPEG 2000 format
jpg JPEG files
jpm JPM format
ldf LuraDocument format
lwf LuraWave format
pcx Zsoft Paintbrush
pbm Portable bitmap
pgm Portable graymap
png Portable Networks Graphics
ppm Portable pixelmap
raw RAW image data
tga Truevision Targa
tif Tagged image file format
The ico format will be useful if you intend to add a Favicon for your blog.
Jquery Tooltips for Blogger
 Tooltips are used to generate small, floating boxes of the kind often used to provide contextual help in operating systems. Tooltips are almost always created dynamically based on user interaction (such as hovering over an element with the mouse).
To see an example tooltip hover with your mouse right here. Many have been looking forward how to use tooltips in blogger and here is the solution. Make sure you make a backup of your template.
Go to your blogger account and open "Layout" and go to "Edit HTML" section! Look for a line like this:
Find this piece of code (CTRL + F)
</head>
Immediately Before that code you searched paste this
<!-- jQuery -->
<script src='http://ajax.googleapis.com/ajax/libs/jquery/1.3.2/jquery.min.js' type='text/javascript'/>
<!-- begin Tooltips -->
<script type='text/javascript'>
$(document).ready(function(){
$("a.tooltip").easyTooltip();
});
</script>
<script type='text/javascript'>
//<![CDATA[
(function($){$.fn.easyTooltip=function(options){var defaults={xOffset:20,yOffset:30,tooltipId:"easyTooltip",clickRemove:false,content:"",useElement:""};var options=$.extend(defaults,options);var content;this.each(function(){var title=$(this).attr("title");$(this).hover(function(e){content=(options.content!="")?options.content:title;content=(options.useElement!="")?$("#"+options.useElement).html():content;$(this).attr("title","");if(content!=""&&content!=undefined){$("body").append("<div id='"+options.tooltipId+"'>"+content+"</div>");$("#"+options.tooltipId).css("position","absolute").css("top",(e.pageY-options.yOffset)+"px").css("left",(e.pageX+options.xOffset)+"px").css("display","none").fadeIn("fast")}},function(){$("#"+options.tooltipId).remove();$(this).attr("title",title)});$(this).mousemove(function(e){$("#"+options.tooltipId).css("top",(e.pageY-options.yOffset)+"px").css("left",(e.pageX+options.xOffset)+"px")});if(options.clickRemove){$(this).mousedown(function(e){$("#"+options.tooltipId).remove();$(this).attr("title",title)})}})}})(jQuery);
//]]>
</script>
<!-- end tooltips -->
Next step find this Piece of code
]]></b:skin>
paste this code before the code you search above
#easyTooltip{
padding:5px 10px;
border:1px solid #EF6D21;
background: #181C18;
color:#E0EFE0;
}
EF6D21 - Border Color181C18 - Tooltip background colorE0EFE0 - Text Color
you may change the code in orange,black and green in any color you want...
then Save it.
to appear the Jquery Tooltips in your blog use this format:
<a class='tooltip' title='See this a Tooltip Sample' href="Your Link URL here">Your Text Here</a>
Add stripe ads in blogger

Stript ads,how to make this stript to add functionality in blogger like navbar is showed at top in bloggers.You must have seen these stripe adds in many bloggers nowadays,as i when started blogging used to see that stripe add in johnchow blog and he use to sell that add for hundreds of dollars.This add will be shown at top of every page and is fixed add as we scroll it remains at same place.
Now i will tell you how to make this stripe ad to work in blogger, as it was designed as an wordpress plugin to be get used in wordpress blogs,but was based on javascipts,so it can be used by bloggers too as it we can use javascripts in bloggers becuse bloggers support javascrits.
Login into blogger with your ID
Click Layout
Click Edit HTML tab
Click Download Full Template and please back up your template first.
Find this piece of code
Click Layout
Click Edit HTML tab
Click Download Full Template and please back up your template first.
Find this piece of code
]]></b:skin>
immediately before that paste this code below
#mta_bar {
background:#003366;
border-top: 3px solid #6699ff;
margin: 0;
padding: 7px 0;
z-index: 100;
bottom:0px;
right:0px;
width: 100%;
overflow: auto;
position: fixed;
}
* html #mta_bar{
/*IE6 hack*/
position: absolute;
width: expression(document.compatMode=="CSS1Compat"? document.documentElement.clientWidth+"px" : body.clientWidth+"px");
}
#mta_bar .left { float: left; text-align: center; font-family: Arial; font-size: 13px; font-weight: bold; font-style: normal; color: #0000FF; width:92%;}
#mta_bar .right {font-family: Arial, Helvetica, sans-serif; float: right; text-align: center; font-weight: normal; font-size: 10px;letter-spacing: 0; width: 30px; white-space: nowrap;}
#mta_bar .right a {font-size: 10px; color: #0000FF; text-decoration: underline;}
#mta_bar .right a:hover {font-size: 10px; color: #0000FF; text-decoration: none;}
#left_bar a {background: url('https://blogger.googleusercontent.com/img/b/R29vZ2xl/AVvXsEg3HmBop749Mm7MWTELn5BthQoSkZ7SjcoWQszl3BKrynWF_J8bknvjrb7s9kqjKaI_TRNpjtJSdXgK4AvUgGcLwM2rNUQT3cB3Cte5O8Be9MQ0bn9v7sAa4MFv6o76Meap-ENNg-Kq6B0/?imgmax=800') no-repeat; text-decoration: none; color: #fff; padding:5px 0px 5px 30px;}
#left_bar a:hover { text-decoration: underline; color: #fff; }
Find this code in your template
</head>
and paste this code below before the code above.
<script type='text/javascript'>
//<![CDATA[
var mta_arr = new Array();
var mta_clear = new Array();
function mtaFloat(mta) {
mta_arr[mta_arr.length] = this;
var mtapointer = eval(mta_arr.length-1);
this.pagetop = 0;
this.cmode = (document.compatMode && document.compatMode!="BackCompat") ? document.documentElement : document.body;
this.mtasrc = document.all? document.all[mta] : document.getElementById(mta);
this.mtasrc.height = this.mtasrc.offsetHeight;
this.mtaheight = this.cmode.clientHeight;
this.mtaoffset = mtaGetOffsetY(mta_arr[mtapointer]);
var mtabar = 'mta_clear['+mtapointer+'] = setInterval("mtaFloatInit(mta_arr['+mtapointer+'])",1);';
mtabar = mtabar;
eval(mtabar);
}
function mtaGetOffsetY(mta) {
var mtaTotOffset = parseInt(mta.mtasrc.offsetTop);
var parentOffset = mta.mtasrc.offsetParent;
while ( parentOffset != null ) {
mtaTotOffset += parentOffset.offsetTop;
parentOffset = parentOffset.offsetParent;
}
return mtaTotOffset;
}
function mtaFloatInit(mta) {
mta.pagetop = mta.cmode.scrollTop;
mta.mtasrc.style.top = mta.pagetop - mta.mtaoffset + "px";
}
function closeTopAds() {
document.getElementById("mta_bar").style.visibility = "hidden";
}
//]]>
</script>
finally right above this code
</body>
Paste this...
<div id='mta_bar'>
<div id='left_bar'><span class='left'><a href='http://widgetscorner.blogspot.com/2010/10/stript-addhow-to-make-this-stript-to.html' target='_blank'>How to add this srtipe add In blogger,Grab it here ?</a></span></div>
<span class='right' onmouseout='self.status=''' onmouseover='self.status='Widgetscorner.blogspot.com';return true;'> <img align='absmiddle' border='0' onClick='closeTopAds();return false;' src='https://blogger.googleusercontent.com/img/b/R29vZ2xl/AVvXsEjbaFulumCgIER5c6qGOhJ6wrKZBdsSfB-AkiwHewh46iso71IomtGKz1D7_Nz_yk8uHIMb8lL20tzeunE03g6x8HhBzJqEBH_jdtRsrJVxvNWgqU76nBk0-KeM9p1G9aUGV_m5wrZiZvE/?imgmax=800' style='cursor:hand;cursor:pointer;'/></span></div>
Now if you want it to be shown ads above, replace the code you add above ]]></b:skin> with this one.
#mta_bar { background: #FFFFE1; border-bottom: 1px solid #808080; margin: 0 0 3px 0; padding: 4px 0; z-index: 100; top: 0; left: 0; width: 100%; overflow: auto; position: fixed; }
* html #mta_bar{ /*IE6 hack*/
position: absolute; width: expression(document.compatMode=="CSS1Compat"? document.documentElement.clientWidth+"px" : body.clientWidth+"px"); }
#mta_bar .left { float: left; text-align: center; font-family: Arial; font-size: 13px; font-weight: bold; font-style: normal; color: #0000FF; width:92%;}
#mta_bar .right {font-family: Arial, Helvetica, sans-serif; float: right; text-align: center; font-weight: normal; font-size: 10px;letter-spacing: 0; width: 30px; white-space: nowrap;}
#mta_bar .right a {font-size: 10px; color: #0000FF; text-decoration: underline;}
#mta_bar .right a:hover {font-size: 10px; color: #0000FF; text-decoration: none;}
#left_bar a { text-decoration: none; color: #0000FF; }
#left_bar a:hover { text-decoration: underline; color: #0000FF; }
Show Recent Comments

Log in to your Blogger account
Page element > add a gadget > Html/Javascript
Paste this code below inside the box
Page element > add a gadget > Html/Javascript
Paste this code below inside the box
<script style=text/javascript src=http://www.freewebs.com/filer/blogger/rc1blogger.js ></script><script style=text/javascript >var a_rc=6;var m_rc=true;var n_rc=true;var o_rc=100;</script><script src=http://WidgetsComment.blogspot.com/feeds/comments/default?alt=json-in-script&callback=showrecentcomments ></script>
Remember to Change the Code in red with your Blogger id
Then save.
Create Vertical Menu

We will make a vertical menu like the image. Ok let's do it
Login to blogger then choose "Layout-->Edit HTML"
Find this piece of code
Find this piece of code
]]></b:skin>
Immediately before that paste this code
.glossymenu, .glossymenu li ul{
list-style-type: none;
margin: 0;
padding: 0;
width: 185px; /*WIDTH OF MAIN MENU ITEMS*/
border: 1px solid black;
}
.glossymenu li{
position: relative;
}
.glossymenu li a{
background: white url('http://blog.superinhost.com/vertical/blue1.gif') repeat-x bottom left;
font: bold 12px Verdana, Helvetica, sans-serif;
color: white;
display: block;
width: auto;
padding: 5px 0;
padding-left: 10px;
text-decoration: none;
}
.glossymenu li ul{
position: absolute;
width: 190px;
left: 0;
top: 0;
display: none;
}
.glossymenu li ul li{
float: left;
}
.glossymenu li ul a{
width: 180px;
}
.glossymenu li a:visited, .glossymenu li a:active{
color: white;
}
.glossymenu li a:hover{
background-image: url('http://blog.superinhost.com/vertical/blue2.gif');
}
* html .glossymenu li { float: left; height: 1%; }
* html .glossymenu li a { height: 1%; }
You can change the menu color, look at the red text (blue1.gif and blue2.gif). Change it with some color menu below.
For example, if you want to choose red color, then the code would be like this :
.glossymenu li a{
background: white url('http://blog.superinhost.com/vertical/red.gif') repeat-x bottom left;
Then
.glossymenu li a:hover{
background-image: url('http://blog.superinhost.com/vertical/red.gif');


