The Best Gadget For Blogger
Add Digg Button

Log in to your blogger account
Go to edit html
Make sure to back up your template first
Now find this
<data:post.body/>
Immediately before that paste this code
<!-- DIGG -->
<div style='float:right;'><script type='text/javascript'>digg_url = '<data:post.url/>';</script><script src='http://digg.com/tools/diggthis.js' type='text/javascript'/></div>
Then Save.
Dancing Links and Pictures
Log in to your blogger account
Go to Edit Html
Make sure to Backup template first
Now find this code
</head>
Immediately before that paste this code
<!--DANCING-NUDGE-LINKS-STARTS-->
<script src='http://code.jquery.com/jquery-latest.js' type='text/javascript'/>
<script type='text/javascript'>
$(document).ready(function() {
$('a.nudge').hover(function() { //mouse in
$(this).animate({ paddingLeft: '20px' },400);
}, function() { //mouse out
$(this).animate({ paddingLeft: 0 }, 400);
});
});
</script>
<!--DANCING-NUDGE-LINKS-STOPS-http://bloggerstop.net-->
How it works?
For links
<a href="Your URL" class="nudge">Text Here!</a>
Move Mouse Here!
For images
<a href="Image URL" class="nudge"><img src="Image Url"/></a>

<a href="Your URL" class="nudge">Text Here!</a>
Move Mouse Here!
For images
<a href="Image URL" class="nudge"><img src="Image Url"/></a>
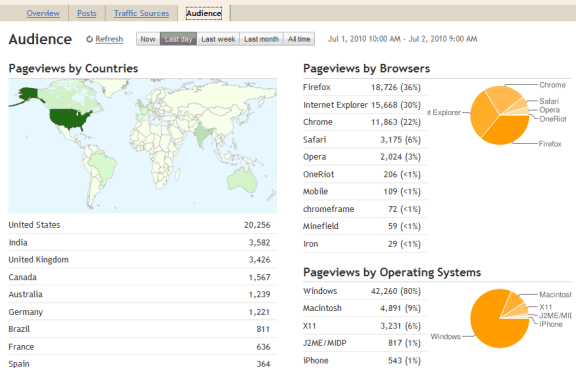
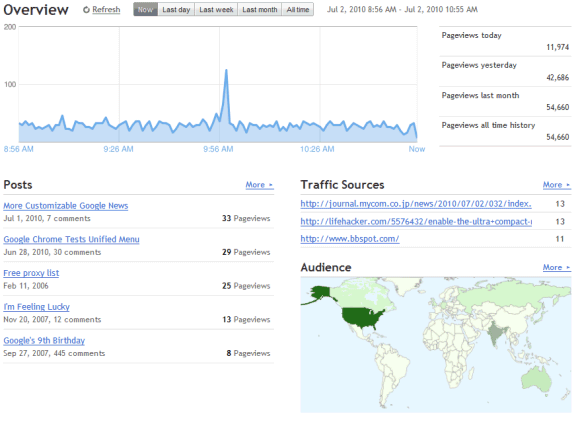
New Blogger Stats
Introducing Blogger Stats
Just in time for our eleventh birthday, we are excited to introduce Stats for Blogger. First launched to Blogger in Draft back in July, Blogger Stats is a cool real-time stats service that's fully integrated with Blogger; you don't need to do anything to enable it for your blog. You can find the new Stats tab on your blog’s dashboard—go ahead and take it for a spin!
Feature Highlights
Stats is an important piece of the blogging puzzle, as it allows you to track your blog's traffic and find out exactly what your audience is looking for. As such, integrated, real-time stats has been one of the most frequently requested features from our users. You can find more information about Blogger Stats in our earlier announcement; meanwhile, here are some quick highlights for you.
* Real-time tracking. Each time your blog is viewed, you can see the change on your stats almost immediately
* Insights about your audience. Top search keywords, countries, browsers, and more
* Great user interface. Beautiful, easy-to-read graphs and charts
Updates
After our initial launch to Blogger in Draft, we had some very helpful feedback and suggestions from you. Based on them, we’ve made improvements including the following:
* Self-view exclusion. Some of you wanted Blogger Stats to exclude your own pageviews, and now there’s an option for that: On Stats | Overview, click on the “Don’t track your own pageviews” link (it’s on the right side, under the pageview summary) and select the “Don’t track my pageviews” option. We’re also now excluding traffic coming from Blogger admin pages and post Preview, providing more accurate pageview data.
* More effective bot traffic filtering. We’ve made several improvements to detect “bots” (the non-human visitors, such as crawlers) including extending our list of known “bots” to provide more accurate pageviews from real visitors.
* Internationalization. Blogger Stats is now available in more than 40 languages.
We hope you like Blogger Stats. By the way, there must be something good about August—not only is it our birth month, we’ve gone from four Admin Dashboard tabs to six, just this month alone! (The other new tab we’ve added this month was the Comments tab, which was another highly requested feature.) We still have some more ground to cover, but just wanted to say we’re working really hard to deliver the features you’ve wanted to see on Blogger. Looking forward to seeing you all at the upcoming Meetup!

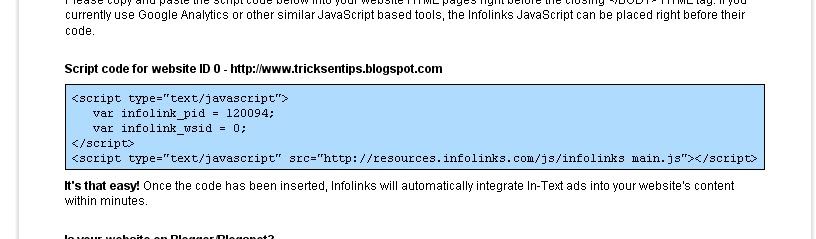
Infolinks on Blogger
Puting Infolinks to your blog will increases your revenue to your blog provided you have lot of traffic to your blog.
Go to Infolinks.com
Register there and finally when you get the ad code copy that.
See Image Like this:
Login to your Blogger
Click on Layout.
Then click on Edit HTML.
Find </body>
Paste the code given by Infolinks to you just before the body tag.
Click on Layout.
Then click on Edit HTML.
Find </body>
Paste the code given by Infolinks to you just before the body tag.
Remember!
It takes 2 business days(all days in the week except saturday and sunday)
It takes 2 business days(all days in the week except saturday and sunday)
For the infolinks ads to appear on your blogger blog.
It will appear if is accepted.
How to install MyBlogLog on Blogger?

- First, make a full backup of your blog template by going to Template>Edit HTML in your Blogger dashboard, then clicking on the "Download full template" link near the top of the page. It is always good practice to do this before making any adjustments to your blog's template in case you make a mistake and need to revert back to a working template afterwards!
- Next, go back to the Edit HTML section of your dashboard, and check the "expand widget templates" box. Then, just before the closing </head> tag in your template, insert the following lines of code:
<script src='http://blog.merlinox.com/MrX/Blog/test/myBlogAvatar2.js' type='text/javascript'/>
This will link to the javascript used to power the comment avatars which is hosted by Merlinox. - Next, you will need to find the following line of code:
<b:loop values='data:post.comments' var='comment'>
This will be in the comments section of your template, and is easily found using the search function of your browser (CTRL+F). If you cannot find this line, this is probably because you have forgotten to expand the widget templates! - Right after this phrase, add the following section of code:
<div style='border:0;float:left;margin: 0 5px 0 0;'>
<script>
myBlogAvatar('<data:comment.id/>','<data:comment.authorUrl/>');
</script>
</div> - Now, save your template and take a look at one of your blog posts which has a few comments. You will see that any commenter who has a MyBlogLog account and avatar will now have their image featured beside their name. Those who do not have a MyBlogLog account will feature the default question mark avatar instead.
As you have read, this is quite an easy hack to implement in your blog. This will enable MyBlogLog comment avatars for your comments, even if you are not a member of MyBlogLog yourself!
Add Apture toolBar for your Blog

Today no one can deny that the social bookmarking and sharing is one of the most important factors for making your blog more popular and more visible for all your targeted visitors.
And i’m sure that you want to make it easier for your visitors to share your posts on their favorite social networking sites.
today we’ll talk about the new Apture ToolBar and it’s features and how to add it to your blogger ( blogspot ) blog.
About Apture ToolBar and it’s features.
The Apture Site Bar is a new way to give readers more information without leaving the page. this is what Apture authors says about the toolbar, but i’ll try to describe what is this toolbar can do for you,
once your visitor scroll down on your blog, this bar will appear loaded with some great features.
- Share on facebook button with a counter.
- Tweet this for twitter button with a counter.
- Share on email
- Search box with jquery, and this mean that your visitor don’t have to leave the page when he search for another content.
- When your visitor can select any part of your posts text small button will appear that says Search
- You can customize it with your own logo.
How To Add It To Your Blog.
You can add it in a very easy way, please visit www.apture.com,
and click Design a bar now
and on the next page, please fill the following info.
- Your website address:
- Your email:
- Upload a Logo or Set Title you can upload your blog logo from your computer ( don’t forget to click upload ) , or just type your blog title.
- Pick your bar color
and now click Get my bar. please wait till the site finish loading and i’ll give you a code titled, Apture Magic Javascript
Copy the code and now go to your blogger account,
navigate to Layout >> Edit html and now find the following code.
</body>
and paste your toolbar code before it.
Now Click Save Template.


